Before we start...
The main goal of my final work was to create a 3D spatial display. Usually, everybody thinks about it as a very hard
thing to do, even impossible. But it really can be created in your home during few months.
The Idea
Some time ago I went to my friend living near me, and he showed me something really beautiful - it was 4 LED soldered
to a fast rotating plate. And when it started to rotate so fast that I couldn't recognise any detail of the rotating part,
the LED started to blink. And I saw something similar to analog clock. That was really amazing.
Not so long after that I saw the Perspecta 3D spatial display announcement and started
to read about it. It was amazing. The pictures were great. I started to think hardly how to create something like this by myself.
I've realised, that projector-way of creating 3D spatial display like Perpspecta was totally over my possibilities. It was too
expensive. So I considered that I have to use some kind of cheap light source. Do you know something cheaper than LED diodes?
After some time that I've spend trying to satisfy different requirements - electronic, mechanic and computer-side I've made
following construction decisions:
1. The rotating part will have the same size as normal CD-disc.
2. The motor will be taken from a tape-recorded
3. The box will be taken from damaged CD-ROM
4. The light will be created by 64 LED organised in 8x8 matrix.
5. The synchronisation and angle-position will be calculated with help from timers and crack transoptor soldered to rotor.
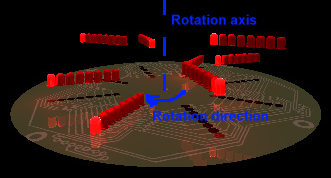
The Display
LED diodes organised in 8x8 matrix are rotating around rotation axis. Angle position is calculated in 9-bit accuracy,
so the angle resolution is set to 512 slices. Finally, the maximum display resolution is 8x8x512. For animations
smaller resolution is used, due to memory requirements - there is only 128kB of SRAM on board.
 Pic 1. display grid.
|
 Pic 2. Schematic LED locations.
|
The Project
When the main decisions about display parameters are made, the display entered its project stage. It takes about a week
to draw the schematic, collect electronic parts and create the PCB. In this stage I've used Protel 99 SE package.
In fact, for some elements I've waited much longer than week, but all main
engineering works at this stage takes about a week.
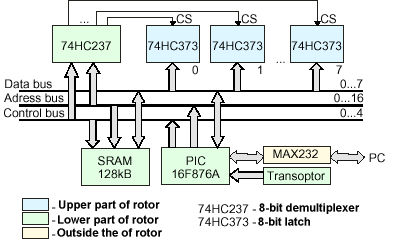
Pic 3. Block diagram |
Main rotor consists of two rounded PCB's. The radius of them is 60mm. They are
connected with 16 goldpins and 4 distance sleeves. Both of them ares 2 sided.
They were created using photochemical method.
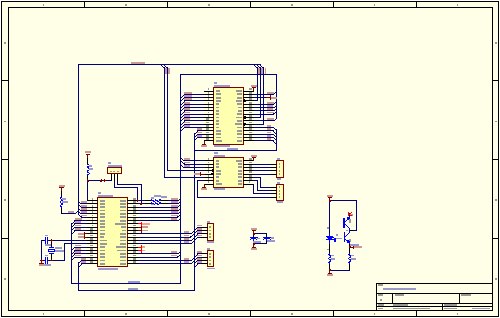
Pic 4. Main schematic |
The Realisation
It takes one month of my life to create it. Hard, but interesting work. Fighting many problems from electronic, mechanic or computer-side
part of the project. Do you know that PCB is digested faster from the bottom side? Do you know how badly designed is RS232 interface
libraries in Windows API? Do you know how to position the rotor correctly to prevent it from vibrations? In fact, mechanical part
was worst for me, since I knew almost nothing about the mechanics. And I have not got financial resources to employ a mechanical engineer.
Finally, The device made from almost everything (have you ever seen "Scraphead challenge" on discovery?) started to work. And I
can say it very simply - it was worth the time I've spent on it. It works. The pictures that are displayed are similar to these
shown in s-f films. The animations are really beautiful.

Pic 5. Cross-section of display. |
The film presentation
I've made short film to describe the main project idea in about 1 minute.
The 30MB version is available here. It
has good quality and it's compressed with Xvid ;) codec. The 10MB
version is located here, also coded with
XviD ;).
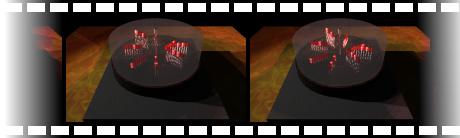
Pic 6. The idea film. |
Awards & competitions
The project was submitted to competition for ABB prize.
It passed successfully the first stage, winning with more than 60% of Ph.D. projects.
|